


There are various reasons why you might want to move your WordPress site. Maybe you’re dissatisfied with your current hosting because the site loads too slowly, or the customer service is subpar. Or you want to upgrade to a faster server like a VPS or cloud hosting. Sometimes you want to change your domain name, or you have a test or development environment you want to launch live.
Whatever the reason, there are four different ways to move your WordPress site. From completely manual for the tech-savvy among us to completely worry-free by professionals. In this article, I discuss all the options so you can easily choose what best suits your situation.
Method 1: The manual migration
When to choose this method?
The manual migration is for you if you want to maintain full control over the process and have technical knowledge. It’s the most complex method but gives you the greatest flexibility.
What do you need?
- An FTP client such as FileZilla
- Access to phpMyAdmin or another database tool
- Basic knowledge of files and databases
Step-by-step plan
1. Backup files
Download the entire wp-content folder (or all files) from your old website via FTP. This may take some time depending on the size of your site.
2. Export database
Create a .sql export of your entire database via phpMyAdmin. This contains all your content, settings, and user information.
3. Upload files
Upload all downloaded files to the new server via FTP. Make sure the folder structure remains intact.
4. Create new database
Create a new, empty database on your new hosting. Note the database name, username, and password – you’ll need these later.
5. Import database
Import the .sql file into the new database via phpMyAdmin.
6. Adjust wp-config.php
Update the wp-config.php file with the new database details.
7. Update URLs
Use a tool like the Better Search Replace plugin or run an SQL query to replace the old domain name with the new one in the database.
Pros and cons
Pros:
- Full control over the process. Every step, from file transfer to database import, you perform yourself. This means you know exactly what’s happening and are not dependent on the limitations of a tool.
- No dependency on plugins. Since you’re not installing extra software, you avoid possible compatibility issues, security risks, or limitations that plugins may bring.
- Always works, regardless of hosting or website size. This method works guaranteed for any WordPress site, regardless of size, complexity, or with which hosting provider you are.
Cons:
- Very error-prone. A small error, like a typo in wp-config.php or a wrong step during the database import, can make your entire website unreachable. Solving such issues requires patience and expertise.
- Time-consuming. Downloading and uploading thousands of files via FTP and processing large databases can, depending on the size of your site, take hours.
- Requires substantial technical knowledge. You must be comfortable with FTP, phpMyAdmin, and editing PHP configuration files. Without this knowledge, the chance of problems is high.
Method 2: Using a migration plugin
When to choose this method?
This is the ideal method for almost everyone. You get the perfect balance between user-friendliness and control without needing technical skills. This is a method I often use myself for moving smaller websites.
Popular plugins
- All-in-One WP Migration – Very user-friendly
- Duplicator – Advanced options for experienced users
- UpdraftPlus – Mainly known for backups, but you can also use it to migrate
Step-by-step plan (with All-in-One WP Migration)
When I migrate a site with a plugin, I always use the free version of All-in-One WP Migration.
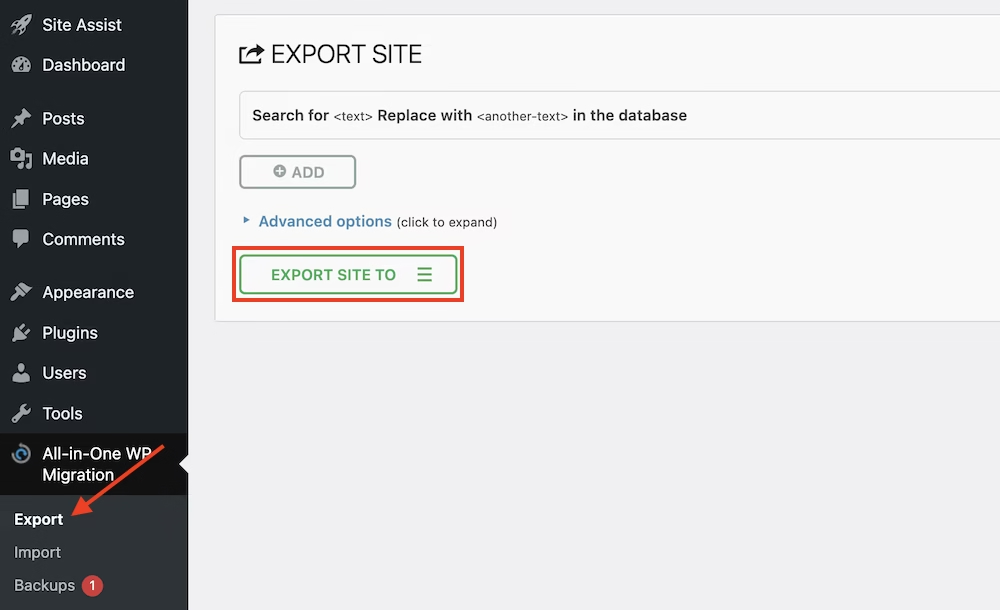
1. Install & export
Install the plugin on your old website and create an export file (.wpress) of your entire site.
2. New WordPress installation
Ensure you have a clean WordPress installation running on your new hosting.
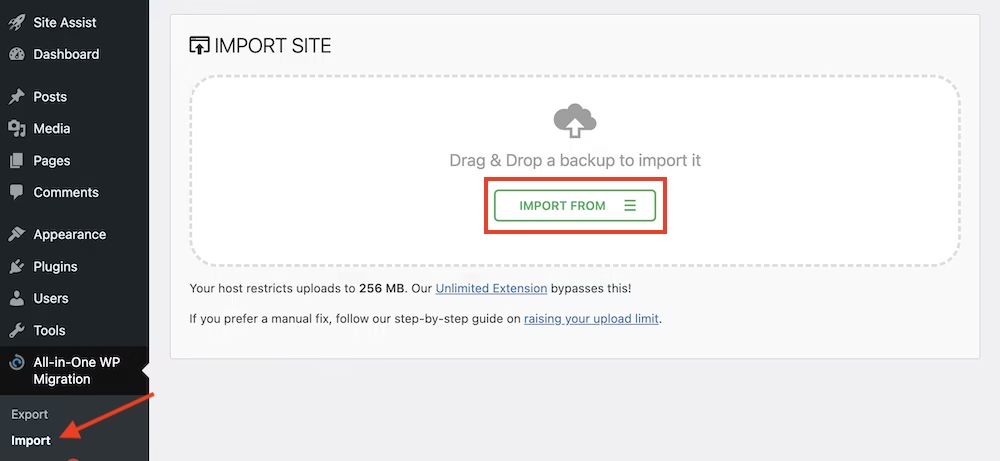
3. Install & import
Install the same plugin on the new site and import the .wpress file.
4. Finish up
The plugin automatically overwrites everything and handles the URL adjustments. Then log in again with your old login details.
Pros and cons
Pros:
- Fast and reliable. A plugin automates the entire process, resulting in a migration often completed within minutes with a very small chance of errors.
- Very user-friendly. The steps are packaged in a clear, graphical interface. You don’t have to touch any code or dive into databases. You simply follow the on-screen instructions.
- Automatically resolves URL issues. One of the trickiest steps in a migration—adjusting all internal links and media URLs—is handled fully automatically and correctly by the plugin.
Cons:
- Limitations in free versions. Many plugins have a limit on the maximum file size you can import in their free version. For larger websites, a paid version or add-on is often necessary.
- Dependency on the plugin. If the plugin contains a bug or is not compatible with your server environment (such as the PHP version), the migration can fail. You are then dependent on the support from the developer.
Method 3: Through your web host’s control panel
When to choose this method?
This option is perfect if your hosting provider offers it and you quickly want to make a copy, for example, for a test or staging site. Or you have a site design you want to use for another website. The easiest way is to simply clone the relevant site and remove all content.
How does it work?
Many hosting control panels like DirectAdmin or Plesk have tools like the WP toolkit. These almost always contain a “Clone” or “Staging” function that does the work for you.
Step-by-step plan
1. Log in to your hosting panel
Find your WordPress installation in the control panel.
2. Choose the clone option
Select “Clone,” “Staging,” or “Copy” – the exact naming varies by host.
3. Specify new location
Specify where you want to place the copy (another domain, subdomain, etc.).
4. Automatic copy
The tool automatically copies all files and the database for you.
Pros and Cons
Pros:
- Extremely fast and easy. Often it is just a matter of a few clicks in your hosting panel. Within minutes, a complete copy of your website is ready for use.
- No extra plugins needed. You don’t need to install anything on your WordPress site. The functionality is directly integrated into your hosting environment, minimizing the chance of conflicts.
- Fully automated. The hosting provider’s tool handles everything: copying the files, duplicating the database, and correctly configuring the new installation.
Cons:
- Less flexible. These tools are often designed for one specific purpose. You typically have little to no control over the details of the migration process.
- Works only internally. This method is intended only for copying a site within the environment of your current host. You cannot use it to move to another provider.
Method 4: Let your new web host do it for you
When to choose this method?
This is the best option if you don’t have the time, inclination, or technical knowledge and want to be sure that everything is done correctly. Specialized WordPress hosts like my.host can handle a move for you in no time. Perfect for beginners, but also for people who simply don’t have the energy for these kinds of tasks. The one time in my life that I switched web hosts, I took advantage of the free relocation service.
How does it work?
Professional hosting providers take care of the entire relocation process for you. You only need to provide the necessary information.
Step-by-step plan
1. Choose a host with relocation service
Select a provider like my.host that offers free relocation service.
2. Order your hosting
Choose an appropriate hosting package for your website.
3. Provide access
Provide the necessary information from your old website (WordPress login, FTP, etc.) via their secure procedure.
4. Sit back
The experts perform the full relocation, thoroughly test the website, and let you know when everything is ready.
Pros and Cons
Pros:
- Completely stress-free. You don’t have to worry about technical details, possible errors, or downtime. You give the task and can focus on other important matters.
- Professionally executed by experts. The relocation is performed by professionals who migrate WordPress sites daily. They know all pitfalls and ensure a smooth transition.
- No technical knowledge required. This is the perfect solution if you have no technical experience at all. You only need to provide login information.
- Often a free service. Many quality hosting providers offer this for free as part of a new hosting package to make the transition as attractive as possible.
- Guarantee that it is done right. A professional party guarantees the result. If something does go wrong, they will fix it for you.
Cons:
- None, as long as you work with a provider that knows what they are doing.
Which method suits you?
The choice depends on your technical knowledge, available time, and comfort level:
- Manual relocation. For techies who want full control.
- Plugin method. For most people – good balance between convenience and control.
- Hosting control panel. For quick copies within the same provider.
- Professional relocation service. For everyone who wants to move without worries.
For most website owners, method 2 (plugin) or method 4 (relocation service) is the best choice.
Ready to move without worries? Check out the packages from my.host and let the experts do the work for you.


Leave a Reply