


Want to create a WordPress blog? Then you’re in the right place.
In this guide, I’ll show you how to get a WordPress blog up and running in half an hour without needing technical knowledge.
All you need to do is follow the next 5 steps that cover the entire process. We will see how to set up hosting and install WordPress, choose the right theme and install plugins, publish a blog post, and more.
After this step-by-step plan, we’ll also look at ways to maintain your blog. We’ll also look at what it means to blog in the era of AI, and what you can do to stay relevant.
Are you ready? Let’s get started.
Why follow this guide precisely? I (Joost Boer) have been setting up and managing WordPress blogs for almost a decade. I’ve made countless mistakes, from choosing overly expensive hosting and not using the right tools to manage my blog, to several strategic missteps regarding managing my blogs. You could say I’m quite seasoned in the world of WordPress blogs.
Setting up a WordPress blog
Step 1: Choose hosting, register a domain name, and install WordPress
WordPress itself is free (when we talk about WordPress here, we always mean WordPress.org, not the paid variant WordPress.com), but you do need web hosting and a domain name.
In this step, we will look at how to install WordPress, how to choose hosting, and how to register a domain name.
Choosing hosting and registering a domain name
Web hosting is where your blog lives on the internet. It’s where all the files – like images, text, and code – are stored. A domain name is what you type into the browser bar to navigate to a website.
Your blog needs both.
In principle, you can choose any web host to run your blog, but one of your best options is my.host. This hosting provider:
- Has lightning-fast servers
- Has a reliable support team consisting of WordPress experts
- Is affordable and hasn’t increased their prices in the last 5 years (unlike almost every other web hosting provider)
- Is easy to use and beginner-friendly
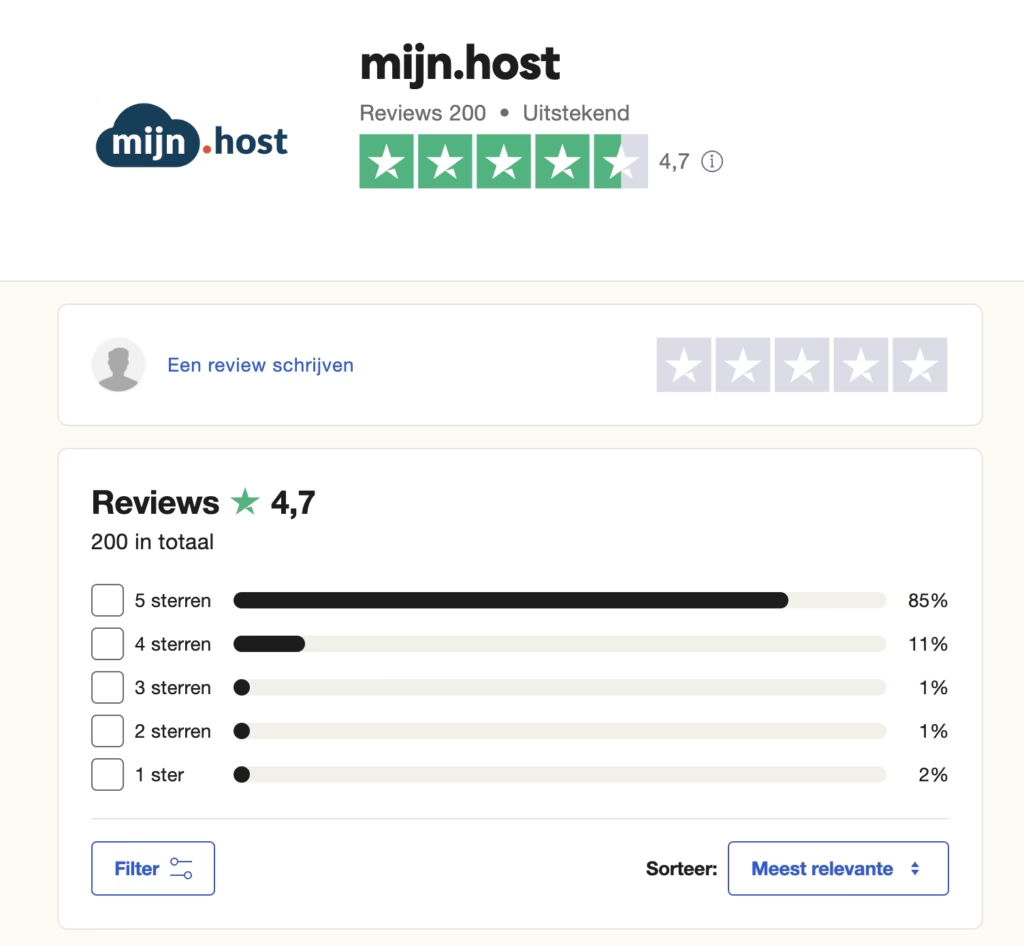
It’s also good to know that my.host has almost unanimously positive user reviews:
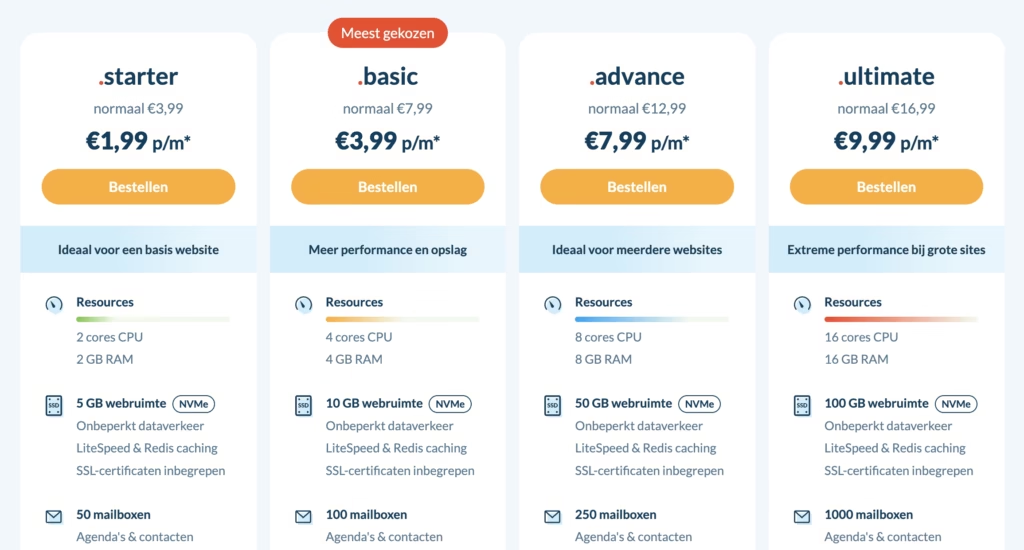
Go to the my.host hosting packages page and choose the .basic package there.
The next step is choosing a domain name for your blog.
Pro tip: Choose a name that is not too specific. This gives you room to expand or go in a different direction in the future.
Suppose you start a blog about healthy smoothies and choose the domain name SmoothieLover.nl. That works fine if you only write about smoothies, but what if you later want to share healthy meals or sports tips? Then the name no longer fits.
A broader name like GezondMetPlezier.nl gives you more flexibility. You can still write about smoothies but also other health topics without your domain name cornering you.
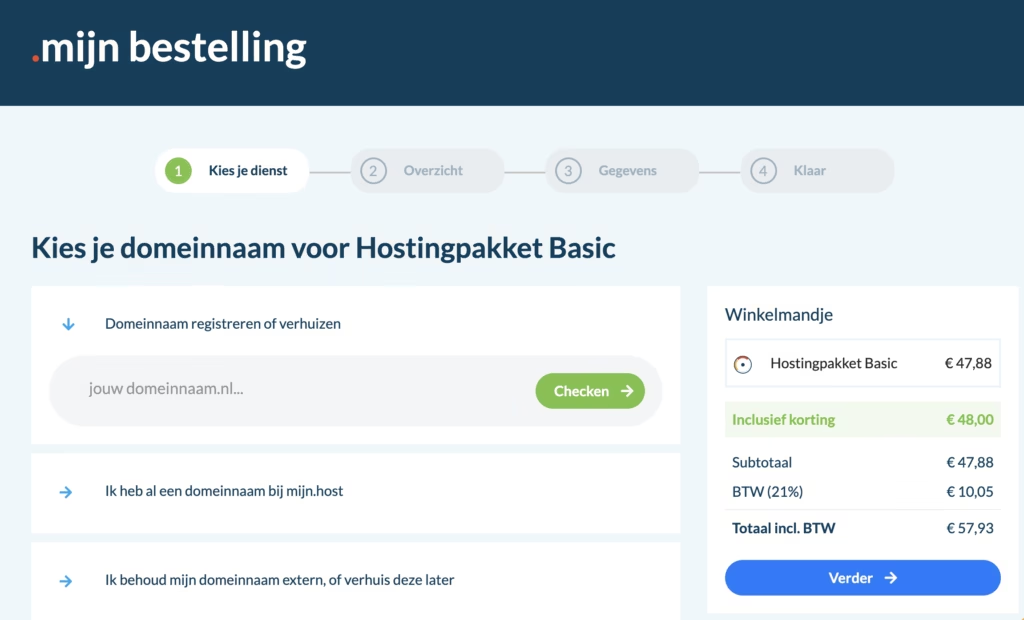
Finally, fill in your personal and payment details, and you can complete your purchase.
Congratulations, you are now the proud owner of a piece of internet real estate!
Now we’ll install WordPress in just a few clicks.
Install WordPress
Where once installing WordPress was quite a hassle, these days it’s done in a flash.
This guide from my.host shows you how to install WordPress.
What is important to do next is to request an SSL certificate for a secure connection. This is something every site uses nowadays.
A secure connection ensures that third parties cannot steal sensitive personal information from your visitors.
How to add an SSL certificate to your site can be seen here. This is also a fully automated process that takes no more than a few clicks.
Step 2: Choose a WordPress theme and install plugins
The appearance of WordPress websites is determined by a WordPress theme. Within a few minutes, you’ll have a WordPress theme installed on your blog.
In this step, I will show you how to install a theme. I will also explain what to consider when choosing a theme. Furthermore, I will tell you which plugins (little programs you click into your WordPress blog to add extra functionality) I use for my own blogs.
Choosing a WordPress theme
Themes determine how your WordPress blog looks. WordPress comes with a default theme, but most people prefer one that looks a bit flashier.
Tinkering with your blog design is one of the most fun things about running a blog, in my opinion. With the right WordPress theme, you can apply a lot of customization to the appearance of your site. Colors, fonts, space between the various elements of your web pages, shadow effects, and little subtleties like rounded corners on your images are easy to apply.
There are thousands of WordPress themes you can install on your site. Some are free. For others, you have to pay (these are premium themes). Many themes have both a free and a paid version. Convenient, because you can try them out without risk. Should you eventually need the paid functionality of the theme, you can always upgrade.
You can change your theme by going to your WordPress dashboard and clicking on Appearance >> Themes.
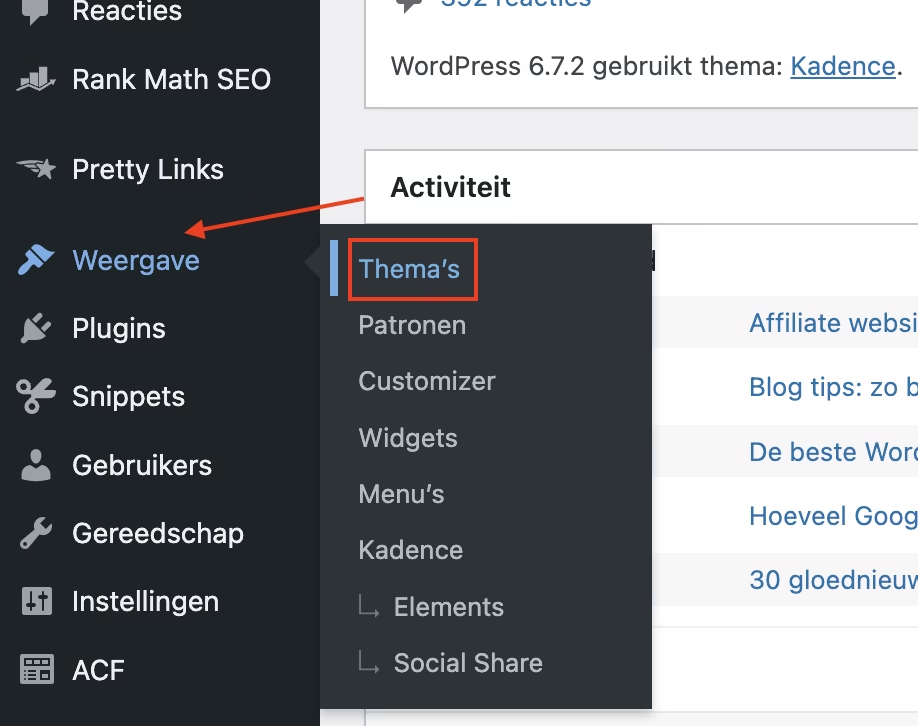
Then click the Add New Theme button in the top left.
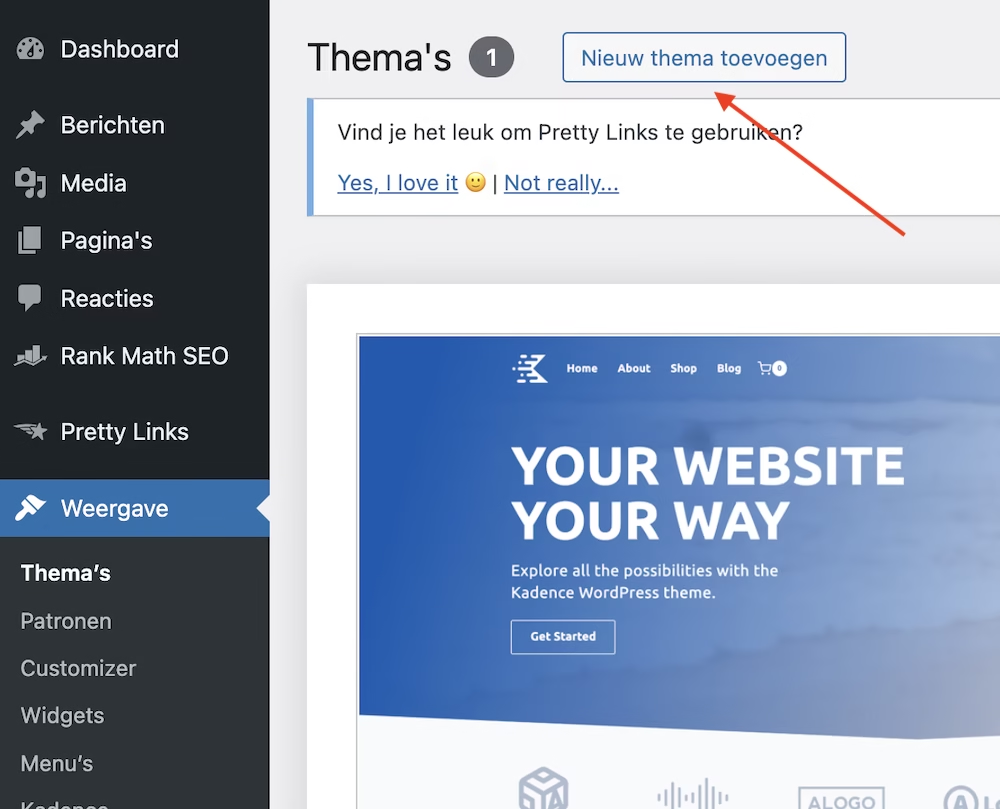
What you will now find are thousands of free WordPress themes to choose from.
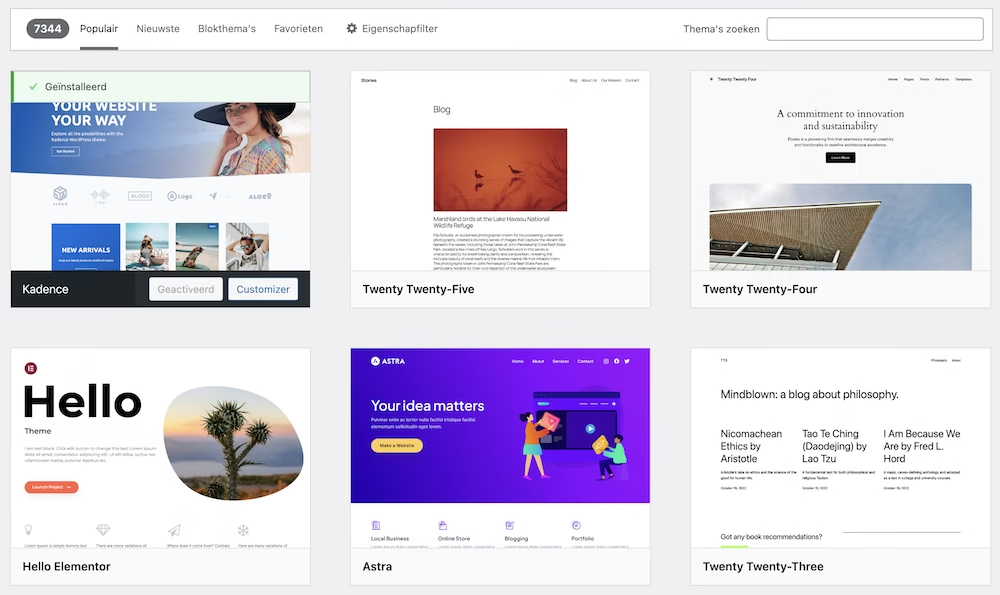
The choice is, to say the least, overwhelming.
But keep in mind: one of the nice things about WordPress is that you can change your theme without having to re-upload all your content to your site. So don’t sweat too much over the choice you’re making now.
You add a theme to your website by clicking the Install button. This button then changes to the Activate button. By clicking this button, the theme is actually used on your website.
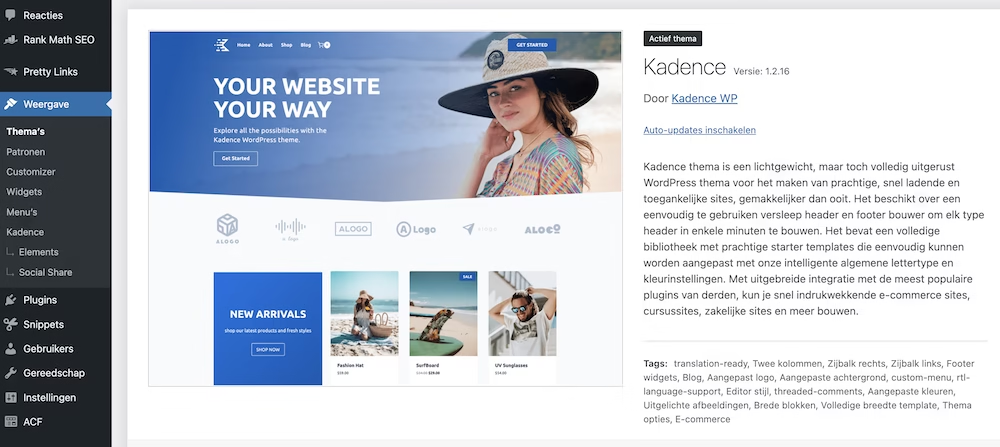
I will at least tell you which theme I use for all my blogs. This is Kadence. Kadence is a highly rated, beautifully designed theme by WordPress users. Kadence falls into the category of premium themes, but it also has a free version.
Other good options are Blocksy and GeneratePress (though the latter is more suitable for experienced users).
Installing Plugins
As mentioned earlier, you use plugins to add extra functionality to your website. For a blog, I recommend at least using the following plugins:
- Kadence Blocks – Gutenberg Blocks for Page Builder Features. Belongs to the Kadence theme. With this plugin, you can easily put together complex page layouts.
- LiteSpeed Cache. A free plugin that makes your website load faster by caching pages.
- Rank Math SEO. This plugin helps you with the organic visibility of your website in search engines.
And perhaps the following plugins will be applicable to your blog sooner or later:
- Code snippets. Allows you to add pieces of code to your site without having to directly fiddle with your theme’s files, or the WordPress core files.
- Kadence Pro / Kadence Blocks Pro. Extra functionality for your theme and page builder.
- Kadence Simple Share. This plugin adds social media share buttons to your content.
- Kadence Conversions. Allows you to add popups to your website.
- Pretty Links. This plugin is especially useful if your blog makes money through affiliate marketing.
These are the plugins I use for my own blogs.
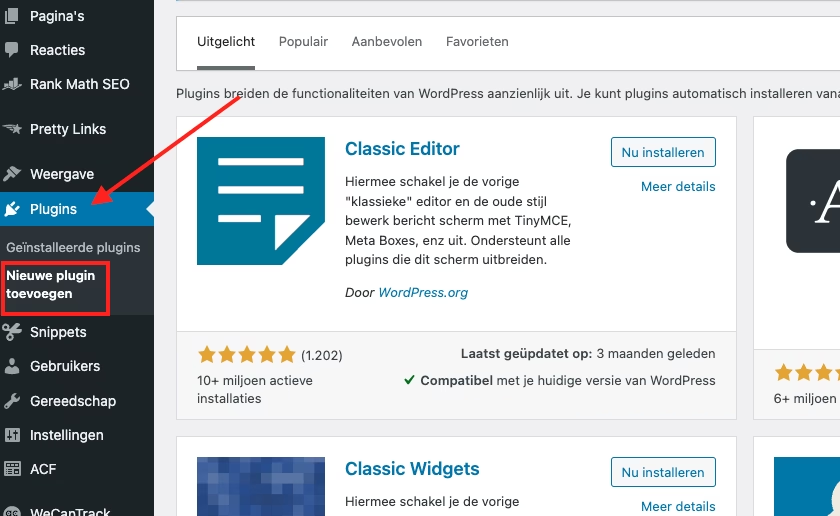
You can add plugins to your blog here:
Step 3: Publish your first WordPress blog post
WordPress is the most user-friendly Content Management System. This allows you to effortlessly publish content.
In this step, I’ll walk you through how to post your first blog article.
Create a new WordPress post
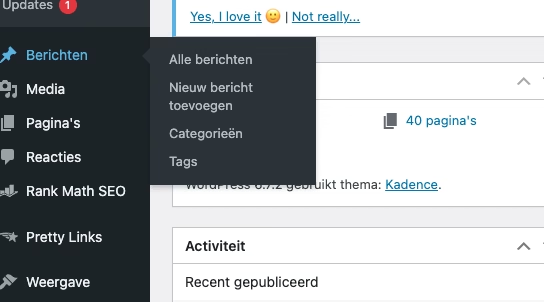
To add a new post to your WordPress blog, navigate to Posts >> Add New.
You will now find yourself in the WordPress Gutenberg editor.
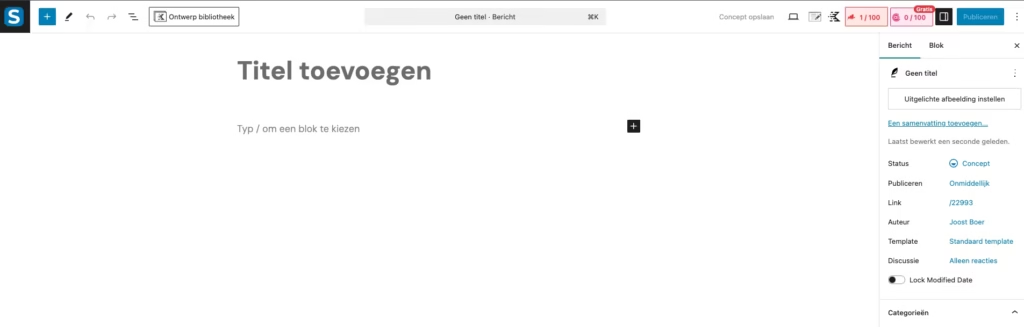
The Gutenberg editor works with blocks (such as titles, paragraphs, and images). This allows you to easily add beautiful formatting to your articles.
To learn more about how the Gutenberg editor works, you can watch this video tutorial (Dutch), or this one (English).
Prepare a WordPress post for publication
Before you publish a post on your blog, make sure you go through the following points.
In the menu on the right, you can add categories, tags, and a featured image to your blog post.
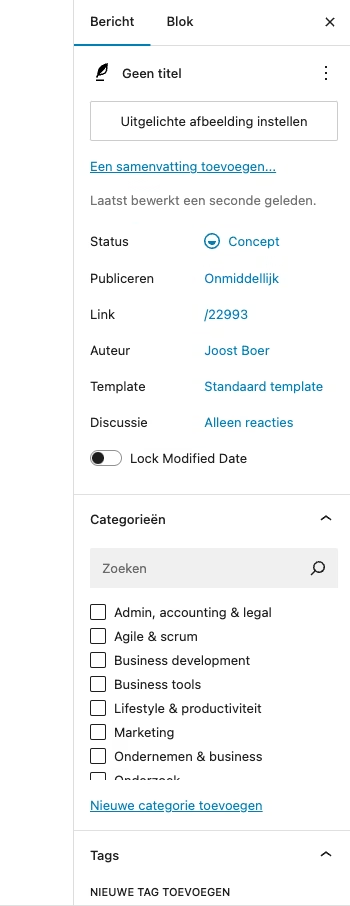
Categories are meant to divide your articles into broad topics. This helps provide structure to your blog. Since categories are hierarchical, you can also create subcategories.
Tags describe specific details of your articles, similar to keywords at the back of a book. Unlike categories, tags are not hierarchical.
Tags are not directly displayed in your articles, but they do help with visibility via your blog’s search function. Categories, on the other hand, are visible to your readers unless you choose to hide them.
Personally, I never use tags for my own blog articles. I stick to categories.
With Featured Image, you can upload an image that appears at the top of your article and as a thumbnail. This is not mandatory but makes your blog more visually appealing.
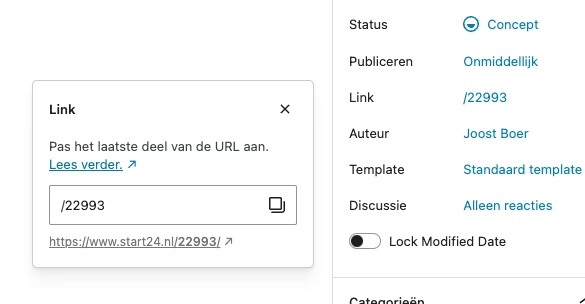
Finally, by clicking the text next to Link, you can adjust the last part of the URL. I recommend keeping this part short: ideally between 3 and 5 words. This makes it more user-friendly for your visitors.
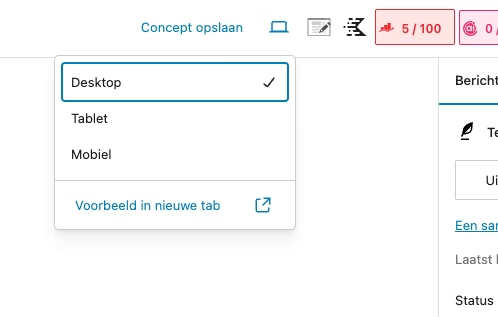
Before publication, you can preview your blog by clicking the Preview in new tab button.
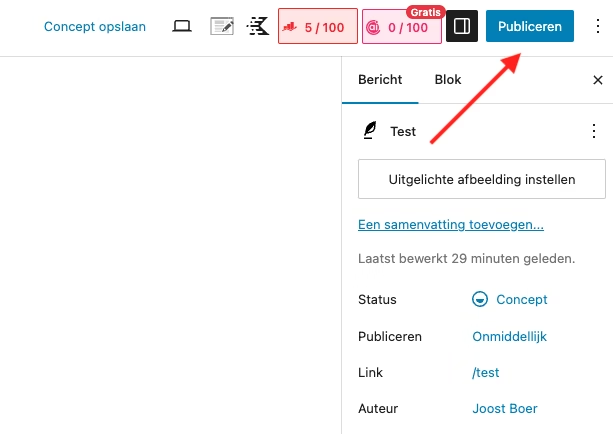
Once you are satisfied with everything, click the Publish button at the top right of the editor.
Step 4: Customize Blog Design
A strong blog design leads to more interaction with your content, a loyal audience, and extra referrals from other websites.
Yet, many bloggers pay little attention to this. This is where you have an opportunity: by investing in design, you immediately stand out from the rest.
The good news? With a few simple design principles, you can make your blog posts look more professional than the vast majority of the internet.
In this step, you’ll discover which principles they are and how to apply them.
Readability
The readability of your WordPress blog primarily depends on:
- The font. Choose a functional and easily readable font, such as Lato, Roboto, or standard system fonts.
- The font size. Ensure your text is at least 16 pixels for optimal readability (18 pixels is even better).
- The text width. Keep your content within a maximum width of 750 pixels to avoid long, unwieldy lines.
- Whitespace and structure. Use short paragraphs, clear subheadings, and supporting images to keep your text manageable.
Many blog websites make the mistake of using tiny fonts and spreading the text across the entire page width. This is not only tiring to read but also undermines the trust of your visitors. Follow these simple guidelines, and you will be ahead of your competition.
Images
People are naturally visually oriented. That’s why it’s essential to enrich your blog content with attractive and relevant images. A blog without visual elements looks bare, uninteresting, and lacks impact.
Images not only make your content more appealing but can also help clarify instructions. Think of the earlier-used screenshots in this article you’re reading, which make complex steps easy to follow.
Be careful when using images from the internet: many of them are copyrighted. For royalty-free images, you can turn to platforms like Pexels or Freepik. As long as you provide proper attribution, you can use their content for free.

Keep the design simple
Less is more.
Don’t add too many frills to your blog. Keep the design functional. You want the focus to really be on the content someone visits your site for, not on distractions caused by various side issues.
Step 5: Making money with your blog
Unless you’re starting a blog to keep friends and family updated on, for example, your travel adventures, chances are you want to make money from it.
A blog can be a profitable venture, but it goes beyond just occasionally writing an article and clicking “Publish.”
In this step, I provide you with a comprehensive overview of the ways to earn money with a blog.
1. Affiliate marketing
Promote products or services from third parties on your website. When a visitor makes a purchase through your link, you receive a commission. Depending on the affiliate program and the type of product, commissions typically range between 1% and 50%. Examples of affiliate programs include the Bol.com Partner Program, Coolblue Partner Program, and Daisycon.
2. Ad networks (Google AdSense and Mediavine)
Join an ad network like Google AdSense, which places ads on your site. You earn per click or per 1,000 impressions. While the earnings per visitor are often lower than with affiliate marketing, with sufficient traffic, you can still earn a significant amount. More advanced ad networks like Mediavine and AdThrive require higher visitor numbers and quality criteria.

3. Selling advertising space
Rent out advertising space on your website directly to companies for a fixed amount per month. This can be more lucrative and predictable than working with ad networks, especially if your site serves a specific niche and has a loyal audience.
4. Selling online courses and e-books
Leverage your expertise by selling online courses, e-books, or other digital products. This provides full control over your revenues and eliminates dependency on third parties. Once created, these products can generate long-term revenue with minimal extra effort.
5. Lead generation
Collect and sell leads to companies. For example, if you have a website about gardening, you can collect leads from visitors interested in gardening services and sell these to gardening companies. This model works especially well in specific niches with high customer values.
6. Accepting donations
Ask your visitors for financial support through donations. This works especially well if you offer unique, valuable content and have built a loyal community. Platforms like Patreon can help by setting up a steady income stream from your most dedicated fans.
7. Sponsored posts
Publish paid articles provided by companies or write your own content about their products or services. This is often referred to as native advertising and can be a subtle way to integrate ads without disrupting the user experience. Be sure to be transparent with your readers about sponsored content.
8. Ecommerce
Sell physical products directly through your website. This requires managing inventory, logistics, and customer service. Even though it’s more labor-intensive, it can be very profitable, especially if you offer a unique product line that addresses your audience’s needs.
9. Generate leads for your own services
Use your website to generate leads for your own professional services. By providing valuable content that showcases your expertise, you can attract potential clients interested in your services, which can lead to direct assignments and long-term client relationships.
10. Building an email list
Collect email addresses from your visitors to build a direct communication line. An email list allows you to keep your audience updated about new content, offers, or products, which can lead to higher engagement and conversions. Email marketing remains one of the most effective ways to build and maintain a relationship with your audience.
Maintaining your WordPress blog
Before we delve into how to perform maintenance on your WordPress blog, it’s important to understand why this is necessary. These are the main reasons:
- Security updates protect your site from hackers. WordPress is the most used CMS in the world, and thus a popular target for cybercriminals, much like Windows is for operating systems. Regular updates patch security vulnerabilities and reduce the chances of your blog being hacked.
- Updates ensure compatibility between all parts of your site. A WordPress blog consists of various components, such as the WordPress core, themes, and plugins. If maintenance is neglected, compatibility issues can arise, leading to errors or a site that no longer works entirely.
- New updates give you access to improved features. Developers are continuously working on improvements and new features. By keeping your site up-to-date, you gain access to these.
- Backups provide a safety net when something goes wrong. A significant part of WordPress maintenance is regularly making backups. If something goes wrong, such as an update that breaks your site or a server problem, you can quickly restore a previous version.
- Your blog stays fast and performs better. Fast blogs have a great advantage: they offer a better user experience, increase conversions, and rank higher in search engines.
Then the question remains, how often should you perform maintenance on your blog? The good news is that you can automate some of the above points. However, it’s wise to keep an eye on things. You should dedicate yourself to maintaining your blog at least once a month. If your blog is mission-critical, then a weekly frequency is more logical. Generally, you shouldn’t need more than 5 minutes to do this.
Keeping software up-to-date
The most crucial component of WordPress blog maintenance is ensuring that the software you use is always up-to-date.
Keep WordPress itself (the core) up-to-date through your hosting panel. At my.host, you can also choose to keep the core automatically up-to-date.
You can update your plugins via the WordPress dashboard. When there’s a new version for a plugin, it is indicated. You can also set whether updates should be performed automatically (via the blue link “Enable Auto-updates”). For most of my websites, I use this option because I trust the developers of all the plugins I use, and I consider it highly unlikely that something will break on my sites due to an update.
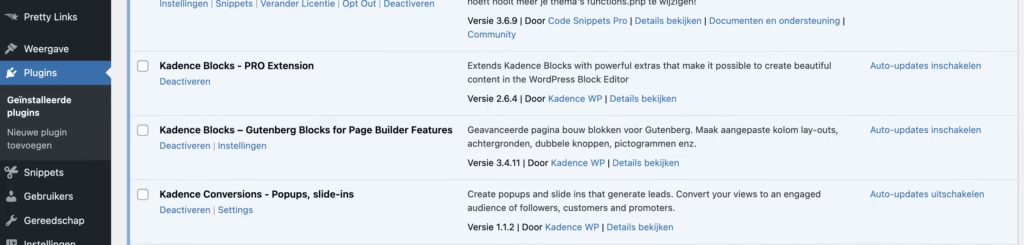
However, if you want to play it safe, you can always choose to perform these updates manually.
You can keep your WordPress theme up-to-date in the same way. Go to Appearance to do this.
TIP: Remove plugins and themes you don’t use. Removing plugins and themes you don’t use has several benefits:
- Your blog becomes lighter and faster.
- Your blog becomes safer. The less software you install on your site, the less vulnerable you are.
So, regularly clean up your blog and check if all the software on it is still useful.
Creating Backups
Choose a good host like my.host that automatically makes daily backups of your blog. Depending on your hosting package, you can also make manual backups. It’s always a good idea to do this when you’re going to change something on your site, such as installing a new plugin or launching a new design.
For extra security, you might also consider making additional backups via a plugin such as All-in-One WP Migration.
Keeping your blog relevant in the age of AI
When you start a blog, you can’t ignore AI. The fact is that in the coming years, people will consume certain types of content more frequently through AI chatbots than via your blog, which you built with blood, sweat, and tears.
Below are my tips for keeping your blog relevant in the age of AI.
Let only real experts speak
Generic SEO content written by non-experts quickly loses value. Make sure your blog articles are written by people with in-depth knowledge of the subject. This increases credibility and offers your readers unique insights.
Focus on original, in-depth content
Instead of superficial articles, focus on in-depth analyses and unique perspectives. This sets you apart from the crowd and offers added value to your readers.
Stay updated on AI developments
The AI landscape is evolving rapidly. By staying informed about the latest developments, you can anticipate trends and adjust your content strategy as needed.
Integrate AI tools into your content strategy
Utilize AI tools to optimize your content, from SEO analysis to content creation. This can increase your efficiency and help you compete better.
Build a strong community
An engaged reader community is invaluable. Encourage interaction, respond to feedback, and create content that meets the needs of your community.
Diversify your content formats
Don’t limit yourself to written articles. Also, consider podcasts, videos, and infographics to reach a broader audience and make your content more appealing.
Invest in personal branding
A strong personal brand identity can set you apart in a saturated market. Let your unique voice and perspective shine through in your content.
By applying these strategies, you can make your blog relevant and future-proof.
In conclusion
I hope this guide has helped you. As you’ve seen, creating a WordPress blog is not that complicated at all.
And if you follow the tips in this guide, your blog can generate income sooner than you think.


Leave a Reply